Tutorial
This brief tutorial provides a few examples for each of the modules to demonstrate that what pyhelpers could offer to assist us in performing data manipulation tasks in our day-to-day work.
Preparation - Create a data set
To begin with, let’s use NumPy and Pandas to create an example data set, which is used throughout this tutorial.
Note
For demonstration purposes, firstly, we can use the function numpy.random.rand to generate a 100-by-100 Numpy array of random samples drawn from a standard uniform distribution, and name it random_array:
>>> import numpy as np  # Import NumPy and abbreviate it to 'np'

>>> np.random.seed(0)  # Ensure that the generated array data is reproducible

>>> random_array = np.random.rand(100, 100)
>>> random_array
array([[0.5488135 , 0.71518937, 0.60276338, ..., 0.02010755, 0.82894003,
        0.00469548],
       [0.67781654, 0.27000797, 0.73519402, ..., 0.25435648, 0.05802916,
        0.43441663],
       [0.31179588, 0.69634349, 0.37775184, ..., 0.86219152, 0.97291949,
        0.96083466],
       ...,
       [0.89111234, 0.26867428, 0.84028499, ..., 0.5736796 , 0.73729114,
        0.22519844],
       [0.26969792, 0.73882539, 0.80714479, ..., 0.94836806, 0.88130699,
        0.1419334 ],
       [0.88498232, 0.19701397, 0.56861333, ..., 0.75842952, 0.02378743,
        0.81357508]])

>>> random_array.shape  # Check the shape of the array
(100, 100)
Then, we use the class pandas.DataFrame to transform random_array into a Pandas data frame, which is presented in tabular form, and name it data_frame:
>>> import pandas as pd  # Import Pandas and abbreviate it to 'pd'

>>> data_frame = pd.DataFrame(random_array, columns=['col_' + str(x) for x in range(100)])
>>> data_frame
       col_0     col_1     col_2  ...    col_97    col_98    col_99
0   0.548814  0.715189  0.602763  ...  0.020108  0.828940  0.004695
1   0.677817  0.270008  0.735194  ...  0.254356  0.058029  0.434417
2   0.311796  0.696343  0.377752  ...  0.862192  0.972919  0.960835
3   0.906555  0.774047  0.333145  ...  0.356707  0.016329  0.185232
4   0.401260  0.929291  0.099615  ...  0.401714  0.248413  0.505866
..       ...       ...       ...  ...       ...       ...       ...
95  0.029929  0.985128  0.094747  ...  0.369907  0.910011  0.142890
96  0.616935  0.202908  0.288809  ...  0.215006  0.143577  0.933162
97  0.891112  0.268674  0.840285  ...  0.573680  0.737291  0.225198
98  0.269698  0.738825  0.807145  ...  0.948368  0.881307  0.141933
99  0.884982  0.197014  0.568613  ...  0.758430  0.023787  0.813575

[100 rows x 100 columns]
[See also the example of saving data as a Pickle file.]
Alter settings for display of data
The module pyhelpers.settings can be used to alter a few frequently-used parameters (of GDAL, Matplotlib, NumPy and Pandas) such that the working environment is adapted to suit our own preferences. For example, we could apply the function np_preferences() with its default parameters whereby we may have a ‘neater’ view of the random_array:
>>> from pyhelpers.settings import np_preferences

>>> # To round the numbers to four decimal places
>>> np_preferences()  # By default, reset=False and precision=4

>>> random_array
array([[0.5488, 0.7152, 0.6028, 0.5449, 0.4237, ..., 0.1832, 0.5865, 0.0201, 0.8289, 0.0047],
       [0.6778, 0.2700, 0.7352, 0.9622, 0.2488, ..., 0.4905, 0.2274, 0.2544, 0.0580, 0.4344],
       [0.3118, 0.6963, 0.3778, 0.1796, 0.0247, ..., 0.2243, 0.0978, 0.8622, 0.9729, 0.9608],
       [0.9066, 0.7740, 0.3331, 0.0811, 0.4072, ..., 0.9590, 0.3554, 0.3567, 0.0163, 0.1852],
       [0.4013, 0.9293, 0.0996, 0.9453, 0.8695, ..., 0.2717, 0.4554, 0.4017, 0.2484, 0.5059],
       ...,
       [0.0299, 0.9851, 0.0947, 0.4510, 0.8387, ..., 0.1239, 0.2947, 0.3699, 0.9100, 0.1429],
       [0.6169, 0.2029, 0.2888, 0.4451, 0.5472, ..., 0.4776, 0.8664, 0.2150, 0.1436, 0.9332],
       [0.8911, 0.2687, 0.8403, 0.7570, 0.9954, ..., 0.9835, 0.4088, 0.5737, 0.7373, 0.2252],
       [0.2697, 0.7388, 0.8071, 0.2006, 0.3087, ..., 0.5063, 0.2319, 0.9484, 0.8813, 0.1419],
       [0.8850, 0.1970, 0.5686, 0.9310, 0.5645, ..., 0.5504, 0.3972, 0.7584, 0.0238, 0.8136]])
To reset the display, we can set reset=True by which the altered parameters are reset to their default values:
>>> np_preferences(reset=True)

>>> random_array
array([[0.54881350, 0.71518937, 0.60276338, ..., 0.02010755, 0.82894003,
        0.00469548],
       [0.67781654, 0.27000797, 0.73519402, ..., 0.25435648, 0.05802916,
        0.43441663],
       [0.31179588, 0.69634349, 0.37775184, ..., 0.86219152, 0.97291949,
        0.96083466],
       ...,
       [0.89111234, 0.26867428, 0.84028499, ..., 0.57367960, 0.73729114,
        0.22519844],
       [0.26969792, 0.73882539, 0.80714479, ..., 0.94836806, 0.88130699,
        0.14193340],
       [0.88498232, 0.19701397, 0.56861333, ..., 0.75842952, 0.02378743,
        0.81357508]])
Note
Basically, the function
np_preferences()inherits the functionality of numpy.set_printoptions, but with some modifications.
For another example, the function pd_preferences() alters a few Pandas options and settings, such as representation and maximum number of columns when displaying a Pandas DataFrame. Applying the function with its default parameters should allow us to view all the 100 columns and the precision of numbers changes to four decimal places.
>>> from pyhelpers.settings import pd_preferences

>>> pd_preferences()  # By default, reset=False and precision=4

>>> data_frame
    col_0  col_1  col_2  col_3  col_4  col_5  col_6  col_7  col_8  col_9  col_10  col_11  col_12  col_13  col_14  col_15  col_16  col_17  col_18  col_19  col_20  col_21  col_22  col_23  col_24  col_25  col_26  col_27  col_28  col_29  col_30  col_31  col_32  col_33  col_34  col_35  col_36  col_37  col_38  col_39  col_40  col_41  col_42  col_43  col_44  col_45  col_46  col_47  col_48  col_49  col_50  col_51  col_52  col_53  col_54  col_55  col_56  col_57  col_58  col_59  col_60  col_61  col_62  col_63  col_64  col_65  col_66  col_67  col_68  col_69  col_70  col_71  col_72  col_73  col_74  col_75  col_76  col_77  col_78  col_79  col_80  col_81  col_82  col_83  col_84  col_85  col_86  col_87  col_88  col_89  col_90  col_91  col_92  col_93  col_94  col_95  col_96  col_97  col_98  col_99
0  0.5488 0.7152 0.6028 0.5449 0.4237 0.6459 0.4376 0.8918 0.9637 0.3834  0.7917  0.5289  0.5680  0.9256  0.0710  0.0871  0.0202  0.8326  0.7782  0.8700  0.9786  0.7992  0.4615  0.7805  0.1183  0.6399  0.1434  0.9447  0.5218  0.4147  0.2646  0.7742  0.4562  0.5684  0.0188  0.6176  0.6121  0.6169  0.9437  0.6818  0.3595  0.4370  0.6976  0.0602  0.6668  0.6706  0.2104  0.1289  0.3154  0.3637  0.5702  0.4386  0.9884  0.1020  0.2089  0.1613  0.6531  0.2533  0.4663  0.2444  0.1590  0.1104  0.6563  0.1382  0.1966  0.3687  0.8210  0.0971  0.8379  0.0961  0.9765  0.4687  0.9768  0.6048  0.7393  0.0392  0.2828  0.1202  0.2961  0.1187  0.3180  0.4143  0.0641  0.6925  0.5666  0.2654  0.5232  0.0939  0.5759  0.9293  0.3186  0.6674  0.1318  0.7163  0.2894  0.1832  0.5865  0.0201  0.8289  0.0047
1  0.6778 0.2700 0.7352 0.9622 0.2488 0.5762 0.5920 0.5723 0.2231 0.9527  0.4471  0.8464  0.6995  0.2974  0.8138  0.3965  0.8811  0.5813  0.8817  0.6925  0.7253  0.5013  0.9561  0.6440  0.4239  0.6064  0.0192  0.3016  0.6602  0.2901  0.6180  0.4288  0.1355  0.2983  0.5700  0.5909  0.5743  0.6532  0.6521  0.4314  0.8965  0.3676  0.4359  0.8919  0.8062  0.7039  0.1002  0.9195  0.7142  0.9988  0.1494  0.8681  0.1625  0.6156  0.1238  0.8480  0.8073  0.5691  0.4072  0.0692  0.6974  0.4535  0.7221  0.8664  0.9755  0.8558  0.0117  0.3600  0.7300  0.1716  0.5210  0.0543  0.2000  0.0185  0.7937  0.2239  0.3454  0.9281  0.7044  0.0318  0.1647  0.6215  0.5772  0.2379  0.9342  0.6140  0.5356  0.5899  0.7301  0.3119  0.3982  0.2098  0.1862  0.9444  0.7396  0.4905  0.2274  0.2544  0.0580  0.4344
2  0.3118 0.6963 0.3778 0.1796 0.0247 0.0672 0.6794 0.4537 0.5366 0.8967  0.9903  0.2169  0.6631  0.2633  0.0207  0.7584  0.3200  0.3835  0.5883  0.8310  0.6290  0.8727  0.2735  0.7980  0.1856  0.9528  0.6875  0.2155  0.9474  0.7309  0.2539  0.2133  0.5182  0.0257  0.2075  0.4247  0.3742  0.4636  0.2776  0.5868  0.8639  0.1175  0.5174  0.1321  0.7169  0.3961  0.5654  0.1833  0.1448  0.4881  0.3556  0.9404  0.7653  0.7487  0.9037  0.0834  0.5522  0.5845  0.9619  0.2921  0.2408  0.1003  0.0164  0.9295  0.6699  0.7852  0.2817  0.5864  0.0640  0.4856  0.9775  0.8765  0.3382  0.9616  0.2317  0.9493  0.9414  0.7992  0.6304  0.8743  0.2930  0.8489  0.6179  0.0132  0.3472  0.1481  0.9818  0.4784  0.4974  0.6395  0.3686  0.1369  0.8221  0.1898  0.5113  0.2243  0.0978  0.8622  0.9729  0.9608
3  0.9066 0.7740 0.3331 0.0811 0.4072 0.2322 0.1325 0.0534 0.7256 0.0114  0.7706  0.1469  0.0795  0.0896  0.6720  0.2454  0.4205  0.5574  0.8606  0.7270  0.2703  0.1315  0.0554  0.3016  0.2621  0.4561  0.6833  0.6956  0.2835  0.3799  0.1812  0.7885  0.0568  0.6970  0.7787  0.7774  0.2594  0.3738  0.5876  0.2728  0.3709  0.1971  0.4599  0.0446  0.7998  0.0770  0.5188  0.3068  0.5775  0.9594  0.6456  0.0354  0.4304  0.5100  0.5362  0.6814  0.2776  0.1289  0.3927  0.9564  0.1871  0.9040  0.5438  0.4569  0.8820  0.4586  0.7242  0.3990  0.9040  0.6900  0.6996  0.3277  0.7568  0.6361  0.2400  0.1605  0.7964  0.9592  0.4581  0.5910  0.8577  0.4572  0.9519  0.5758  0.8208  0.9088  0.8155  0.1594  0.6289  0.3984  0.0627  0.4240  0.2587  0.8490  0.0333  0.9590  0.3554  0.3567  0.0163  0.1852
4  0.4013 0.9293 0.0996 0.9453 0.8695 0.4542 0.3267 0.2327 0.6145 0.0331  0.0156  0.4288  0.0681  0.2519  0.2212  0.2532  0.1311  0.0120  0.1155  0.6185  0.9743  0.9903  0.4091  0.1630  0.6388  0.4903  0.9894  0.0653  0.7832  0.2884  0.2414  0.6625  0.2461  0.6659  0.5173  0.4241  0.5547  0.2871  0.7066  0.4149  0.3605  0.8287  0.9250  0.0460  0.2326  0.3485  0.8150  0.9855  0.9690  0.9049  0.2966  0.9920  0.2494  0.1059  0.9510  0.2334  0.6898  0.0584  0.7307  0.8817  0.2724  0.3791  0.3743  0.7488  0.2378  0.1719  0.4493  0.3045  0.8392  0.2377  0.5024  0.9426  0.6340  0.8673  0.9402  0.7508  0.6996  0.9680  0.9944  0.4518  0.0709  0.2928  0.1524  0.4175  0.1313  0.6041  0.3828  0.8954  0.9678  0.5469  0.2748  0.5922  0.8968  0.4067  0.5521  0.2717  0.4554  0.4017  0.2484  0.5059
..    ...    ...    ...    ...    ...    ...    ...    ...    ...    ...     ...     ...     ...     ...     ...     ...     ...     ...     ...     ...     ...     ...     ...     ...     ...     ...     ...     ...     ...     ...     ...     ...     ...     ...     ...     ...     ...     ...     ...     ...     ...     ...     ...     ...     ...     ...     ...     ...     ...     ...     ...     ...     ...     ...     ...     ...     ...     ...     ...     ...     ...     ...     ...     ...     ...     ...     ...     ...     ...     ...     ...     ...     ...     ...     ...     ...     ...     ...     ...     ...     ...     ...     ...     ...     ...     ...     ...     ...     ...     ...     ...     ...     ...     ...     ...     ...     ...     ...     ...     ...
95 0.0299 0.9851 0.0947 0.4510 0.8387 0.4216 0.2488 0.4140 0.8239 0.0449  0.4888  0.1935  0.0603  0.7856  0.0145  0.4150  0.5455  0.1729  0.8995  0.4087  0.1821  0.6112  0.6394  0.3887  0.0315  0.6616  0.2378  0.1499  0.8209  0.5042  0.4479  0.7548  0.4707  0.6118  0.4062  0.8875  0.5656  0.9025  0.8988  0.7586  0.5481  0.6542  0.2221  0.9191  0.8597  0.7871  0.0255  0.1945  0.9167  0.8091  0.8462  0.4046  0.2564  0.8907  0.3730  0.2989  0.3009  0.8824  0.1769  0.8330  0.4776  0.2611  0.5842  0.2790  0.5149  0.6137  0.5830  0.8162  0.6188  0.2206  0.2949  0.4022  0.7695  0.9042  0.0245  0.9934  0.4915  0.1317  0.5654  0.4585  0.0493  0.5776  0.9316  0.4726  0.2292  0.6709  0.2676  0.9152  0.4770  0.7846  0.0491  0.7325  0.1480  0.2177  0.8613  0.1239  0.2947  0.3699  0.9100  0.1429
96 0.6169 0.2029 0.2888 0.4451 0.5472 0.1754 0.5955 0.6072 0.4085 0.2007  0.3339  0.0980  0.7448  0.0146  0.3318  0.9243  0.1875  0.5235  0.1492  0.9498  0.8206  0.3126  0.7519  0.5674  0.2217  0.1344  0.2492  0.6290  0.9548  0.7769  0.9035  0.1941  0.9146  0.0847  0.9442  0.1412  0.3615  0.3456  0.3299  0.7366  0.8395  0.5705  0.5461  0.2613  0.9033  0.5648  0.4113  0.5595  0.1045  0.1114  0.9273  0.2186  0.2703  0.5572  0.4869  0.5557  0.3654  0.4052  0.1688  0.4970  0.4230  0.9401  0.1298  0.6157  0.9665  0.0980  0.7211  0.8655  0.3322  0.5694  0.0896  0.3371  0.2488  0.6854  0.0557  0.4832  0.5538  0.9313  0.9211  0.0066  0.5810  0.3998  0.5363  0.6496  0.2744  0.7612  0.9205  0.8888  0.7553  0.5245  0.4852  0.7450  0.7727  0.0121  0.0378  0.4776  0.8664  0.2150  0.1436  0.9332
97 0.8911 0.2687 0.8403 0.7570 0.9954 0.1634 0.8974 0.0570 0.6731 0.6692  0.9157  0.2279  0.1716  0.5135  0.9526  0.2789  0.7967  0.3199  0.2551  0.6841  0.7714  0.0131  0.5836  0.5309  0.3890  0.7853  0.3559  0.5440  0.4279  0.4481  0.4856  0.1562  0.8035  0.2906  0.5163  0.2731  0.8593  0.8317  0.9506  0.3643  0.8870  0.8589  0.5738  0.1476  0.7041  0.9448  0.8193  0.0765  0.0225  0.4606  0.9130  0.7224  0.9994  0.6273  0.8822  0.8120  0.5386  0.0905  0.1308  0.8155  0.3694  0.6026  0.2917  0.8915  0.9160  0.9557  0.9286  0.5640  0.6019  0.9622  0.3726  0.6308  0.4397  0.3447  0.9294  0.5696  0.4651  0.0541  0.1555  0.5407  0.9946  0.4594  0.6252  0.8517  0.9184  0.3661  0.1636  0.9713  0.5275  0.8858  0.2985  0.0887  0.8784  0.4166  0.4406  0.9835  0.4088  0.5737  0.7373  0.2252
98 0.2697 0.7388 0.8071 0.2006 0.3087 0.0087 0.3848 0.9011 0.4013 0.7590  0.0574  0.5879  0.9540  0.9844  0.5784  0.0143  0.8399  0.7347  0.0247  0.7567  0.7195  0.0966  0.5364  0.5489  0.8949  0.4431  0.5592  0.5509  0.5194  0.8532  0.9466  0.9149  0.1965  0.8680  0.3178  0.0128  0.5331  0.0943  0.4993  0.7398  0.8458  0.3228  0.8388  0.0571  0.6156  0.3496  0.5488  0.1919  0.2312  0.8364  0.7976  0.8543  0.4784  0.6621  0.4582  0.2491  0.0062  0.9198  0.6971  0.7818  0.0741  0.8829  0.1467  0.8430  0.7647  0.7388  0.6872  0.2025  0.6578  0.1086  0.8596  0.2004  0.4396  0.9060  0.7954  0.0381  0.4885  0.5251  0.8353  0.5970  0.0659  0.4197  0.6602  0.9880  0.3841  0.9846  0.5489  0.4638  0.4154  0.5793  0.4285  0.3835  0.9782  0.4945  0.7802  0.5063  0.2319  0.9484  0.8813  0.1419
99 0.8850 0.1970 0.5686 0.9310 0.5645 0.2116 0.2650 0.6786 0.7470 0.5918  0.2814  0.1868  0.6546  0.2293  0.1628  0.1311  0.7388  0.7119  0.9275  0.2617  0.5895  0.9196  0.2235  0.4540  0.9658  0.9549  0.5116  0.4487  0.9448  0.5995  0.2469  0.5173  0.5726  0.5523  0.4057  0.1464  0.8681  0.1123  0.1395  0.1492  0.0394  0.8577  0.8917  0.1226  0.4616  0.3932  0.1262  0.8644  0.8641  0.7408  0.1666  0.2636  0.1923  0.8325  0.4676  0.1504  0.0101  0.2785  0.9741  0.0317  0.9115  0.0579  0.6718  0.3497  0.4555  0.2211  0.3385  0.3081  0.7089  0.8713  0.4093  0.8162  0.0115  0.7877  0.5260  0.8337  0.2240  0.3767  0.6977  0.8484  0.4783  0.8464  0.5483  0.9914  0.9047  0.3856  0.9555  0.7653  0.5255  0.9910  0.6950  0.1946  0.1140  0.2621  0.7355  0.5504  0.3972  0.7584  0.0238  0.8136

[100 rows x 100 columns]
Similarly, the function pd_preferences() also offers a parameter reset, which defaults to False; by setting reset=True, the altered parameters are reset to their default values. In addition, we can also set reset='all' to reset all Pandas options to their default values, if needed.
>>> pd_preferences(reset=True)

>>> data_frame
       col_0     col_1     col_2  ...    col_97    col_98    col_99
0   0.548814  0.715189  0.602763  ...  0.020108  0.828940  0.004695
1   0.677817  0.270008  0.735194  ...  0.254356  0.058029  0.434417
2   0.311796  0.696343  0.377752  ...  0.862192  0.972919  0.960835
3   0.906555  0.774047  0.333145  ...  0.356707  0.016329  0.185232
4   0.401260  0.929291  0.099615  ...  0.401714  0.248413  0.505866
..       ...       ...       ...  ...       ...       ...       ...
95  0.029929  0.985128  0.094747  ...  0.369907  0.910011  0.142890
96  0.616935  0.202908  0.288809  ...  0.215006  0.143577  0.933162
97  0.891112  0.268674  0.840285  ...  0.573680  0.737291  0.225198
98  0.269698  0.738825  0.807145  ...  0.948368  0.881307  0.141933
99  0.884982  0.197014  0.568613  ...  0.758430  0.023787  0.813575

[100 rows x 100 columns]
Note
The functions that are currently available in the module
pyhelpers.settingshandle only a few parameters for the author’s personal preference. We may change the source code as appropriate to adapt the settings to different tastes.
Specify a directory or a file path
The module pyhelpers.dirs offers to assist with manipulating folders/directories. For example, the function cd() returns an absolute path to the current working directory or, if specified, to a subdirectory or a file any level deep from the current working directory:
>>> from pyhelpers.dirs import cd
>>> import os

>>> cwd = cd()  # The current working directory

>>> # Relative path of `cwd` to the current working directory
>>> rel_path_cwd = os.path.relpath(cwd)
>>> print(rel_path_cwd)
.
To specify a path to a temporary folder, named "pyhelpers_tutorial":
>>> # Name of a temporary folder for this tutorial
>>> dir_name = "pyhelpers_tutorial"

>>> # Path to the folder "pyhelpers_tutorial"
>>> path_to_dir = cd(dir_name)

>>> # Relative path of the directory
>>> rel_dir_path = os.path.relpath(path_to_dir)
>>> print(rel_dir_path)
pyhelpers_tutorial
Check whether the directory "pyhelpers_tutorial\" exists:
>>> print(f'The directory "{rel_dir_path}\\" exists? {os.path.exists(path_to_dir)}')
The directory "pyhelpers_tutorial\" exists? False
If the directory "pyhelpers_tutorial\" does not exist, we could set the parameter mkdir=True by which the directory should be created as we specify the path:
>>> # Set `mkdir` to be `True` to create a folder named "pyhelpers_tutorial"
>>> path_to_dir = cd(dir_name, mkdir=True)

>>> # Check again whether the directory "pyhelpers_tutorial\" exists
>>> print(f'The directory "{rel_dir_path}\\" exists? {os.path.exists(path_to_dir)}')
The directory "pyhelpers_tutorial\" exists? True
When we specify a sequence of names (in order with a filename being the last), the function cd() would assume that all the names prior to the filename are folder names, which specify a path to the file. For example, let’s specify a path to a file named "quick_start.dat":
>>> # Name of a file
>>> filename = "quick_start.dat"

>>> # Path to the file named "quick_start.dat"
>>> path_to_file = cd(dir_name, filename)  # path_to_file = cd(path_to_dir, filename)

>>> # Relative path of the file "quick_start.dat"
>>> rel_file_path = os.path.relpath(path_to_file)
>>> print(rel_file_path)
pyhelpers_tutorial\quick_start.dat
If any of the folders/subfolders of a specified path does not exist, setting mkdir=True should enable the function cd() to create all the missing ones along the path. For example, let’s specify a data directory, named "data", which is contained within the folder "pyhelpers_tutorial":
>>> # Path to a data directory
>>> data_dir = cd("pyhelpers_tutorial", "data")  # equivalent to `cd(path_to_dir, "data")`

>>> # Relative path of the data directory
>>> rel_data_dir = os.path.relpath(data_dir)
>>> print(rel_data_dir)
pyhelpers_tutorial\data
We can use the function is_dir() to examine whether data_dir (or rel_data_dir) specifies a path (or a relative path) to a directory:
>>> from pyhelpers.dirs import is_dir

>>> # Check whether `rel_data_dir` specifies a (relative) path to a directory
>>> print(f'`rel_data_dir` specifies a directory pathname? {is_dir(rel_data_dir)}')
`rel_data_dir` specifies a directory pathname? True

>>> # Check whether the data directory exists
>>> print(f'The directory "{rel_data_dir}\\" exists? {os.path.exists(rel_data_dir)}')
The directory "pyhelpers_tutorial\data\" exists? False
For another example, let’s specify a path to a Pickle file, named "dat.pickle", in the directory "pyhelpers_tutorial\data\":
>>> # Filename of a Pickle file
>>> pickle_filename = "dat.pickle"

>>> # Path to the Pickle file, i.e. cd("pyhelpers_tutorial", "data", "dat.pickle")
>>> path_to_pickle = cd(data_dir, pickle_filename)

>>> # Relative path of the Pickle file
>>> rel_pickle_path = os.path.relpath(path_to_pickle)
>>> print(rel_pickle_path)
pyhelpers_tutorial\data\dat.pickle
Examine rel_pickle_path (or path_to_pickle):
>>> # Check whether `rel_pickle_path` specifies a directory
>>> print(f'`rel_pickle_path` specifies a directory? {os.path.isdir(rel_pickle_path)}')
`rel_pickle_path` specifies a directory? False

>>> # Check whether the file "dat.pickle" exists
>>> print(f'The file "{rel_pickle_path}" exists? {os.path.exists(rel_pickle_path)}')
The file "pyhelpers_tutorial\data\dat.pickle" exists? False
Let’s now set the parameter mkdir to be True:
>>> path_to_pickle = cd(data_dir, pickle_filename, mkdir=True)
>>> rel_data_dir = os.path.relpath(data_dir)

>>> # Check again whether the data directory exists
>>> print(f'The directory "{rel_data_dir}\\" exists? {os.path.exists(rel_data_dir)}')
The directory "pyhelpers_tutorial\data\" exists? True

>>> # Check again whether the file "dat.pickle" exists
>>> print(f'The file "{rel_pickle_path}" exists? {os.path.exists(rel_pickle_path)}')
The file "pyhelpers_tutorial\data\dat.pickle" exists? False
[See also the example of saving data as a Pickle file.]
To delete the directory “pyhelpers_tutorial" (and all contained within it), we can use the function delete_dir():
>>> from pyhelpers.dirs import delete_dir

>>> # Delete the directory "pyhelpers_tutorial\"
>>> delete_dir(path_to_dir, verbose=True)
To delete the directory "pyhelpers_tutorial\" (Not empty)
? [No]|Yes: yes
Deleting "pyhelpers_tutorial\" ... Done.
Save data to / load data from a Pickle file
The module pyhelpers.store can facilitate tasks such as saving our data to, and loading the data from, file-like objects of some popular formats, such as CSV, JSON and Pickle.
For example, we could save the data_frame that has been created in the [Preparation](#tutorial-preparation) section as a Pickle file by using the functions save_pickle() and retrieve it later by using load_pickle(). Firstly, let’s save data_frame to path_to_pickle, which has been specified in the Specify a directory or a file path section:
>>> from pyhelpers.store import save_pickle, load_pickle

>>> # Write `data_frame` to the file "dat.pickle"
>>> save_pickle(data_frame, path_to_pickle, verbose=True)
Saving "dat.pickle" to "pyhelpers_tutorial\data\" ... Done.
Now, we can retrieve the data from path_to_pickle and store the retrieved data in another variable named df_retrieved:
>>> df_retrieved = load_pickle(path_to_pickle, verbose=True)
Loading "pyhelpers_tutorial\data\dat.pickle" ... Done.
Check whether df_retrieved is equal to data_frame (namely, whether they have the same shape and elements):
>>> print(f'`df_retrieved` is equal to `data_frame`? {df_retrieved.equals(data_frame)}')
`df_retrieved` is equal to `data_frame`? True
Before we move on, let’s delete again the Pickle file (i.e. path_to_pickle) and the directory created in the above example:
>>> delete_dir(path_to_dir, verbose=True)
To delete the directory "pyhelpers_tutorial\" (Not empty)
? [No]|Yes: yes
Deleting "pyhelpers_tutorial\" ... Done.
Note
In the module
store, some functions such assave_spreadsheet()andsave_spreadsheets()may require openpyxl, XlsxWriter or xlrd, which are NOT essential dependencies for the installation of pyhelpers. We could install them as needed via an appropriate method such aspip install.
Convert coordinates between OSGB36 and WGS84
The module pyhelpers.geom can assist us in manipulating geometric and geographical data. For example, we can use the function osgb36_to_wgs84() to convert coordinates from OSGB36 (British national grid) to WGS84 (latitude and longitude):
>>> from pyhelpers.geom import osgb36_to_wgs84

>>> # To convert coordinate of a single point (530034, 180381):
>>> easting, northing = 530039.558844, 180371.680166  # London

>>> longitude, latitude = osgb36_to_wgs84(easting, northing)  # Longitude and latitude
>>> (longitude, latitude)
(-0.12764738750268856, 51.507321895400686)
We could also use the function to convert an array of OSGB36 coordinates:
>>> from pyhelpers._cache import example_dataframe

>>> example_df = example_dataframe(osgb36=True)
>>> example_df
                  Easting       Northing
City
London      530039.558844  180371.680166
Birmingham  406705.887014  286868.166642
Manchester  383830.039036  398113.055831
Leeds       430147.447354  433553.327117

>>> xy_array = example_df.to_numpy()
>>> eastings, northings = xy_array.T

>>> lonlat_array = osgb36_to_wgs84(eastings, northings, as_array=True)
>>> lonlat_array
array([[-0.12764739, 51.50732190],
       [-1.90269109, 52.47969920],
       [-2.24511479, 53.47948920],
       [-1.54379409, 53.79741850]])
Similarly, we can convert from the (longitude, latitude) back to (easting, northing) by using the function wgs84_to_osgb36():
>>> from pyhelpers.geom import wgs84_to_osgb36

>>> longitudes, latitudes = lonlat_array.T

>>> xy_array_ = wgs84_to_osgb36(longitudes, latitudes, as_array=True)
>>> xy_array_
array([[530039.55972534, 180371.67967567],
       [406705.88783629, 286868.16621896],
       [383830.03985454, 398113.05550332],
       [430147.44820845, 433553.32682598]])
Note
Conversion of coordinates between different systems may inevitably introduce errors, which are mostly negligible.
Check whether xy_array_ is almost equal to xy_array:
>>> eq_res = np.array_equal(np.round(xy_array, 2), np.round(xy_array_, 2))
>>> print(f'`xy_array_` is almost equal to `xy_array`? {eq_res}')
`xy_array_` is almost equal to `xy_array`? True
Find similar texts
The module pyhelpers.text can assist us in manipulating textual data. For example, suppose we have a word 'angle', which is stored in a str-type variable named word, and a list of words, which is stored in a list-type variable named lookup_list; if we’d like to find from the list a one that is most similar to 'angle', we can use the function find_similar_str():
>>> from pyhelpers.text import find_similar_str

>>> word = 'angle'
>>> lookup_list = ['Anglia',
...                'East Coast',
...                'East Midlands',
...                'North and East',
...                'London North Western',
...                'Scotland',
...                'South East',
...                'Wales',
...                'Wessex',
...                'Western']

>>> # Find the most similar word to 'angle'
>>> result_1 = find_similar_str(word, lookup_list)
>>> result_1
'Anglia'
By default, the function relies on difflib - a Python built-in module - to perform the task. Alternatively, we could also make use of an open-source package, FuzzyWuzzy, via setting the parameter engine='fuzzywuzzy':
>>> # Find the most similar word to 'angle' by using FuzzyWuzzy
>>> result_2 = find_similar_str(word, lookup_list, engine='fuzzywuzzy')
>>> result_2
'Anglia'
Note
The package FuzzyWuzzy is NOT an essential dependency for the installation of pyhelpers>=1.3.0. We need to install it (e.g. via
pip install) to make the function run successfully with settingengine='fuzzywuzzy'.In previous versions of pyhelpers (i.e. pyhelpers<=1.2.14), optional values for the parameter
engineinclude'fuzzywuzzy'and'nltk'. The latter has been replaced with'difflib'since pyhelpers 1.2.15.
Download an image file
The module pyhelpers.ops provides a miscellany of helper functions that may assist with various operations. For example, we can use the function download_file_from_url() to download a file from a given URL.
Let’s now try to download an image file of Python logo from its home page. Firstly, we need to specify the URL of the image file:
>>> from pyhelpers.ops import download_file_from_url

>>> # URL of a .png file of the Python logo
>>> url = 'https://www.python.org/static/community_logos/python-logo-master-v3-TM.png'
Then, we need to specify a directory where we’d like to save the image file, and a filename for it; let’s say we want to name the file "python-logo.png" and save it to the directory "pyhelpers_tutorial\images\":
>>> python_logo_filename = "python-logo.png"
>>> # python_logo_file_path = cd("pyhelpers_tutorial", "images", python_logo_filename)
>>> python_logo_file_path = cd(path_to_dir, "images", python_logo_filename)

>>> # Download the .png file of the Python logo
>>> download_file_from_url(url, python_logo_file_path, verbose=False)
The parameter verbose is by default False. If we set verbose=True, the function would print out relevant information about the download as the file is being downloaded.
Note
When
verbose=True(orverbose=1), the function requires an open-source package tqdm, which is NOT an essential dependency for installing pyhelpers>=1.2.15. We can just install the dependency package viapip installto make the function run successfully.
Assuming tqdm has been installed in our working environment, try:
>>> download_file_from_url(url, python_logo_file_path, if_exists='replace', verbose=True)
"pyhelpers_tutorial\images\python-logo.png": 81.6kB [00:00, 10.8MB/s]
Note
‘…MB/s’ shown at the end of the output above is an estimated speed of downloading the file, which varies depending on network conditions at the time of running the function.
Setting
if_exists='replace'(default) allows us to download the image file again and replace the one that was just downloaded to the specified destination.
Now let’s have a look at the downloaded image file by using Pillow:
>>> from PIL import Image

>>> python_logo = Image.open(python_logo_file_path)
>>> python_logo.show()

Fig. 21 The Python Logo (for illustration in the brief tutorial).
Note
In Jupyter Notebook, we may use IPython.display.Image to display the image in the notebook by running
IPython.display.Image(python_logo_file_path).
To delete "pyhelpers_tutorial\" and the download directory "pyhelpers_tutorial\images\", again, we can use the function delete_dir():
>>> delete_dir(path_to_dir, confirmation_required=False, verbose=True)
Deleting "pyhelpers_tutorial\" ... Done.
Setting the parameter confirmation_required=False can allow us to delete the directory straightaway without having to type yes to confirm the action. This is actually implemented through the function confirmed(), which is also from the module pyhelpers.ops and can be helpful especially when we’d like to impose a manual confirmation before proceeding with certain actions. For example:
>>> from pyhelpers.ops import confirmed

>>> # We can specify any prompting message as to what needs to be confirmed.
>>> if confirmed(prompt="Continue? ..."):
...     print("OK! Go ahead.")
Continue? ... [No]|Yes: yes
OK! Go ahead.
Note
What we type to respond to the prompting message is case-insensitive. It doesn’t have to be precisely
Yesto make the function returnTrue; something likeyes,Yoryecan do the job as well. If we typenoorn, it returnsFalse.The function also provides a parameter
confirmation_required, which defaults toTrue. If settingconfirmation_required=False, a confirmation is not required, in which case this function will become ineffective as it just returnsTrue.
Work with a PostgreSQL server
The module pyhelpers.dbms offers a convenient way of communicating with databases, such as PostgreSQL.
Note
The current release of pyhelpers is only able to deal with PostgreSQL as the module
pyhelpers.dbmsneeds to be further developed to work with other types of databases.
The class PostgreSQL, for example, could assist us in executing some basic SQL statements on a PostgreSQL database server. To demonstrate it works, let’s start with importing the class:
>>> from pyhelpers.dbms import PostgreSQL
Connect to a database
Now, we can create an instance of the class PostgreSQL to connect a PostgreSQL server by specifying the key parameters, including host, port, username, database_name and password.
Note
If we leave
host,port,usernameanddatabase_nameunspecified, their default arguments (namely,host='localhost',port=5432,username='postgres'anddatabase_name='postgres') are passed to instantiate the class, in which case we would connect to the default PostgreSQL server (as is installed on a PC).If the specified
database_namedoes not exist, it will be automatically created along with the class instantiation.If we prefer not to specify explicitly the parameter
password, we could just leave it. In that case, we will be asked to type in the password manually when instantiating the class.
For example, let’s create an instance named postgres, and we’d like to establish a connection with a database named “pyhelpers_tutorial”, which is hosted at the default PostgreSQL server:
>>> postgres = PostgreSQL(database_name="pyhelpers_tutorial")
Password (postgres@localhost:5432): ***
Creating a database: "pyhelpers_tutorial" ... Done.
Connecting postgres:***@localhost:5432/pyhelpers_tutorial ... Successfully.
We can use pgAdmin - the most popular graphical management tool for PostgreSQL - to check whether the database “pyhelpers_tutorial” exists now in the Databases tree of the default server, as illustrated in Fig. 22:
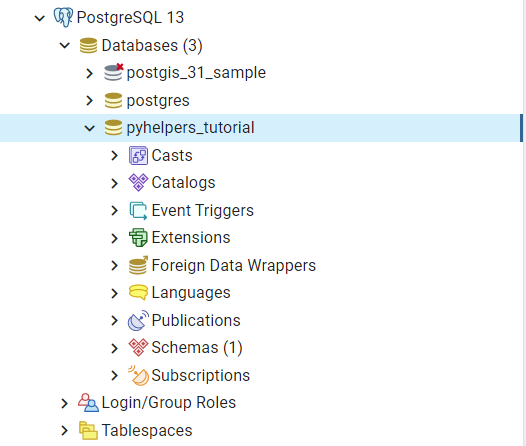
Fig. 22 The database “pyhelpers_tutorial”.
Alternatively, we could also use the method database_exists():
>>> res = postgres.database_exists("pyhelpers_tutorial")
>>> print(f'The database "pyhelpers_tutorial" exists? {res}')
The database "pyhelpers_tutorial" exists? True

>>> print(f'We are currently connected to the database "{postgres.database_name}".')
We are now connected with the database "pyhelpers_tutorial".
In the same server, we can create multiple databases. For example, let’s now create another database named “pyhelpers_tutorial_alt” by using the method create_database():
>>> postgres.create_database("pyhelpers_tutorial_alt", verbose=True)
Creating a database: "pyhelpers_tutorial_alt" ... Done.
As we can see in Fig. 23, the database “pyhelpers_tutorial_alt” has now been added to the default Databases tree:
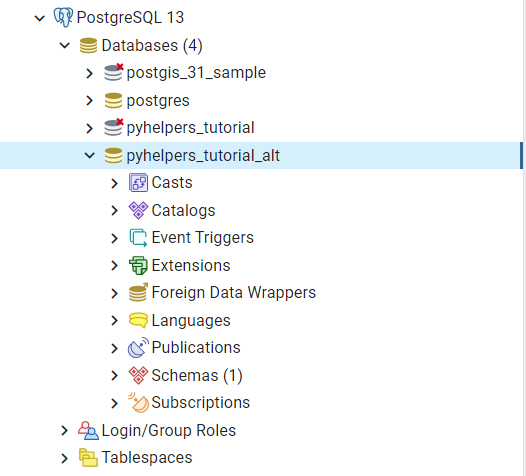
Fig. 23 The database “pyhelpers_tutorial_alt”.
Note
When a new database is created, the instance
postgresdisconnects the currently-connected database and connect to the new one.
Check whether “pyhelpers_tutorial_alt” is the database being connected now:
>>> res = postgres.database_exists("pyhelpers_tutorial_alt")
>>> print(f'The database "pyhelpers_tutorial_alt" exists? {res}')
The database "pyhelpers_tutorial_alt" exists? True

>>> print(f'We are currently connected to the database "{postgres.database_name}".')
We are now connected with the database "pyhelpers_tutorial_alt".
To connect again to “pyhelpers_tutorial”, we can use the method connect_database():
>>> postgres.connect_database("pyhelpers_tutorial", verbose=True)
Connecting postgres:***@localhost:5432/pyhelpers_tutorial ... Successfully.

>>> print(f'We are currently connected to the database "{postgres.database_name}".')
We are now connected with the database "pyhelpers_tutorial".
Import data into a database
With the established connection to the database, we can use the method import_data() to import the data_frame, which has been created in the Preparation section, into a table named “df_table” under the default schema “public”:
>>> postgres.import_data(data=data_frame, table_name="df_table", verbose=2)
To import data into "public"."df_table" at postgres:***@localhost:5432/pyhelpers_tutorial
? [No]|Yes: yes
Importing the data into the table "public"."df_table" ... Done.
We should now be able to see the table in pgAdmin, as illustrated in Fig. 24:
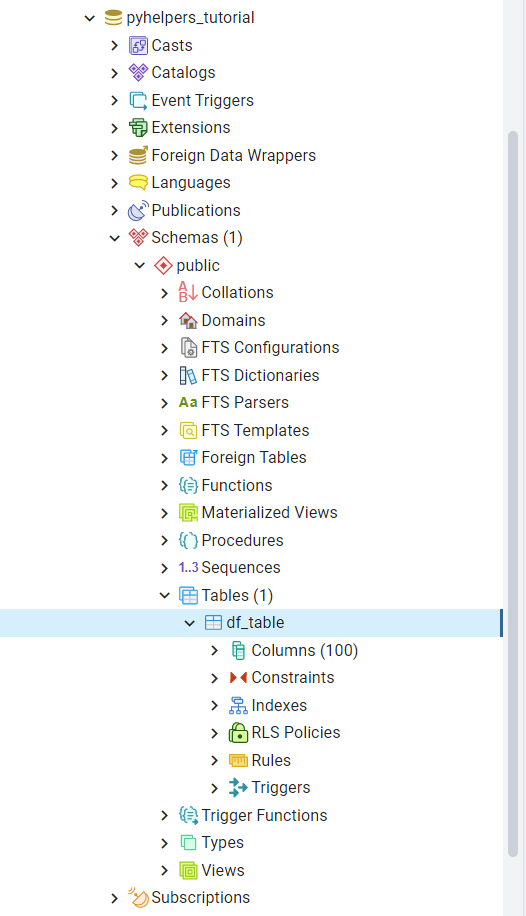
Fig. 24 The table “public”.”df_table”.
The method import_data() relies on the method pandas.DataFrame.to_sql(), with the parameter method being set to be 'multi' by default. Optionally, it can also take the method psql_insert_copy() as an argument to significantly speed up importing data into a database, especially when the data size is fairly large.
Let’s now try to import the same data into a table named “df_table_alt” by setting method=postgres.psql_insert_copy:
>>> postgres.import_data(
...     data=data_frame, table_name="df_table_alt", method=postgres.psql_insert_copy, verbose=2)
To import data into "public"."df_table_alt" at postgres:***@localhost:5432/pyhelpers_tutorial
? [No]|Yes: yes
Importing the data into the table "public"."df_table_alt" ... Done.
In pgAdmin, we can see the table has been added to the Tables list, as illustrated in Fig. 25:
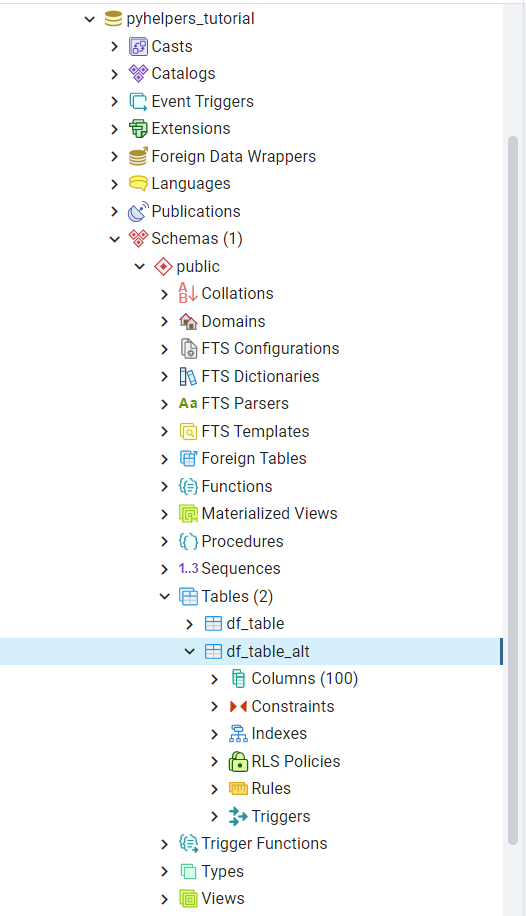
Fig. 25 The table “public”.”df_table_alt”.
Fetch data from a database
To retrieve the imported data, we can use the method read_table():
>>> df_retrieval_1 = postgres.read_table(table_name="df_table")

>>> res = df_retrieval_1.equals(data_frame)
>>> print(f"`df_retrieval_1` is equal to `data_frame`? {res}")
`df_retrieval_1` is equal to `data_frame`? True
Alternatively, we can also use the method read_sql_query(), which serves as a more flexible way of reading/querying data. It takes PostgreSQL statements, and could be much faster when the queried table is fairly large. Let’s try this method to fetch the same data from the table “df_table_alt”:
>>> df_retrieval_2 = postgres.read_sql_query(sql_query='SELECT * FROM "public"."df_table_alt"')

>>> res = df_retrieval_2.round(8).equals(df_retrieval_1.round(8))
>>> print(f"`df_retrieval_2` is equal to `df_retrieval_1`? {res}")
`df_retrieval_2` is equal to `df_retrieval_1`? True
Note
For the method
read_sql_query(), any PostgreSQL statement that is passed to the parametersql_queryshould NOT end with';'.
Drop data
Before we leave this notebook, let’s clear up the databases and tables we’ve created.
We can delete/drop a table (e.g. “df_table”) by using the method drop_table():
>>> postgres.drop_table(table_name="df_table", verbose=True)
To drop the table "public"."df_table" from postgres:***@localhost:5432/pyhelpers_tutorial
? [No]|Yes: yes
Dropping "public"."df_table" ... Done.
To delete/drop a database, we can use the method drop_database():
>>> # Drop "pyhelpers_tutorial" (i.e. the currently connected database)
>>> postgres.drop_database(verbose=True)
To drop the database "pyhelpers_tutorial" from postgres:***@localhost:5432
? [No]|Yes: yes
Dropping "pyhelpers_tutorial" ... Done.

>>> # Drop "pyhelpers_tutorial_alt"
>>> postgres.drop_database(database_name="pyhelpers_tutorial_alt", verbose=True)
To drop the database "pyhelpers_tutorial_alt" from postgres:***@localhost:5432
? [No]|Yes: yes
Dropping "pyhelpers_tutorial_alt" ... Done.
Check which database is the one being currently connected:
>>> print(f"We are currently connected with the database \"{postgres.database_name}\".")
We are currently connected with the database "postgres".
Now we have removed all the databases created above, and restored the PostgreSQL server to its original status.
This is the end of the Tutorial.
Any issues regarding the use of the package are all welcome and should be logged/reported onto the Bug Tracker.
For more details and examples, check Modules.